.svg)
Many customers wonder if there is a way to easily apply a Design Tools theme or template to an entire course. The Multi-Tool LTI does just that when building new courses by creating content templates and then populating modules with those templates. Visit the DesignPLUS user guide's Multi-Tool module to learn more about how the Multi-Tool can easily apply themes to a new course.
But what about for courses that already have content built? In this situation, users must go through the existing pages one at a time to apply Design Tools themes. This may sound like a tedious process, but the following strategy will help you be as efficient as possible:
- First, edit the page and launch the Design Tools sidebar.
- Now pick a theme under the Create/Edit Content >> Choose a Theme panel. Make sure to pick the same theme for each page in a course.
- Once you select a theme, you'll see a styled banner heading appear at the top of your editor. If needed, edit the heading text by using the Create/Edit Content >> Customize Banner Text panel. You'll also notice that the banner heading is inside the Design Tools wrapper, but your existing content is underneath the wrapper. None of the styles will be applied to that content until it is inside the wrapper.
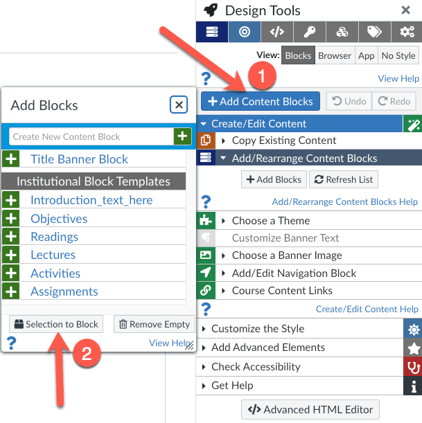
- Click and drag in the editor to select a section of existing content. Then click the Selection to Block button to move your existing content into a content block inside the Design Tools wrapper. You can access the Selection to Block button by clicking on the Add Content Blocks button.
- Repeat step 4 until all of your existing content is inside the Design Tools wrapper.
- Now you can use the Design Tools sidebar to style and enhance the content as needed.
Also, if you have customized content blocks, your institution can add them as content block templates to the primary customizations course so that you can easily drop in those custom blocks as you're applying the tools to the page.
