.svg)
In order to make UDOIT appear in all course navigation menus in your instance by default, you will need to remove the LTI key your institution added during your UDOIT installation call and create a new one. Or, if you prefer, you can update the JSON code in the existing developer key.
Approach 1: Remove and Reinstall
-
Navigate to the account/sub-account where UDOIT was initially installed.
- Go to the Settings page and select the Apps tab.
- Select the View App Configurations button.
- Find UDOIT in the list of apps and select the gear icon to the right of the app name.
- In the dropdown menu that appears, select Delete.
-
Go to the “Developer Keys” page in Canvas.
-
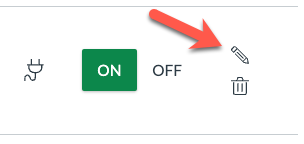
Logged in as a Canvas admin, go to your Canvas root account and select the “Developer Keys” link in the left navigation. Go to the Inherited tab and verify that the UDOIT developer key is enabled. Then, select the Account tab.
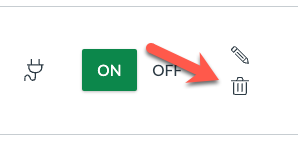
On the Account tab, find the UDOIT LTI key. Select the trashcan icon to delete it.
- Select the +Developer Key button and choose +LTI Key.
-
-
Complete the “Key Settings” form
- Copy the following values into the form.
-
Key Name: Cidi Labs UDOIT LTI
-
Owner Email: developer@cidilabs.com
-
Redirect URIs: https://udoit3.ciditools.com/lti/authorize/check
-
Notes: Optional
-
Configure
-
Method: Enter URL
-
JSON URL: https://udoit3.ciditools.com/lti/config?default=enabled
-
-
-
Save the form by selecting the Save button at the bottom of the page.
-
On the Developer Keys page, select the word ON to enable the newly created key.
-
Copy the new ID created, since this will be used in step 4.
- Copy the following values into the form.
-
Create the UDOIT LTI app.
-
Go to the Canvas account where UDOIT was previously installed.
-
Go to Settings.
-
Select the Apps tab.
-
Select View App Configurations.
-
Select +App to create a new app.
-
Complete the “Add App” form.
-
Configuration Type: By Client ID
-
Client ID: Paste the client ID from the LTI developer key created in step 2.
-
Select Submit.
-
-
-
Approach 2: Update the JSON code
If you're comfortable working with JSON code, you can update the existing developer key instead of doing the remove and reinstall approach.
- Go to the root account and select Developer Keys.
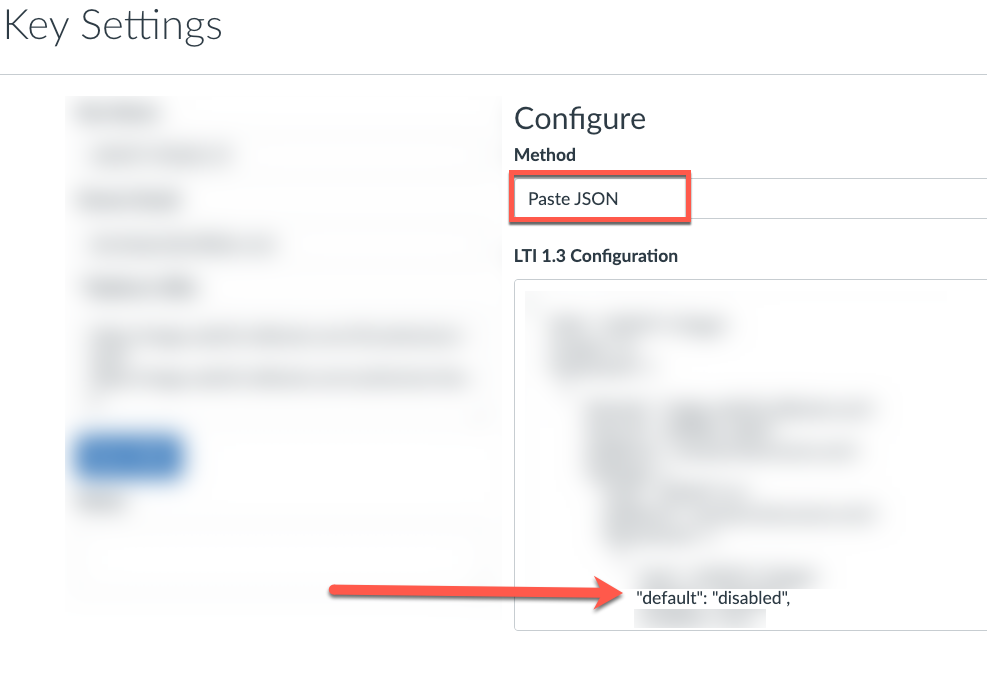
- Find the UDOIT key and select the edit button.
- Change the dropdown from "Manual Entry" to "Paste JSON". You will now see JSON code in a text area.
- Find the line with "default": "disabled", or "default": "enabled", and change to the desired value. Be careful only to change the text value and not any other characters.
- Save the developer key and confirm that the change is working.